Our automated user management allows you to import and configure your New Relic users from your identity provider via SCIM. This guide provides Azure AD-specific details on how to configure the New Relic Azure AD SCIM/SSO application.
Requirements
Before using this guide, read the requirements and procedure overview.
Note that these instructions require going back and forth between your identity provider and New Relic.
Step 1. Create authentication domain and enable SCIM
For how to get to the New Relic authentication domain UI, see Authentication domain.
If you don't already have one, create a new authentication domain for your SCIM-provisioned users by clicking + Add new.
For that authentication domain, under Source of users, select SCIM. Copy and save the API token for later use. Note that this will be shown only once.
Step 2. Set up Azure's New Relic app
Next, you'll set up Azure's New Relic SAML/SCIM app. Azure AD provides an application gallery, which includes various integrations for Azure AD, including the ones that New Relic offers. To set this up:
- Go to the Azure Active Directory admin center, and sign in if necessary. aad.portal.azure.com/
- Click on All services in the left hand menu.
- In the main pane, click on Enterprise applications.
- Click on +New Application.
- Find our SCIM/SSO application by entering New Relic in the name search box, and click on the application New Relic by organization (not New Relic by account).
- Click on Add.
Step 3. Configure connection
Configure the New Relic SCIM/SSO application to automatically provision your users to New Relic.
- From the New Relic SCIM/SSO application page, click on the Provisioning link in the sidebar.
- In the main pane, click on Get started.
- In the Provisioning Mode pick-list, choose Automatic.
- In New Relic's authentication domain UI, set up a new domain with SCIM enabled.
- In Azure AD's New Relic SCIM/SSO app, in the Admin credentials section, fill out the Tenant URL and Secret token fields with the values provided in New Relic's authentication domain UI.
- To verify you can connect to New Relic, click Test Connection.
- When you see a message indicating verification success, click Save.
The New Relic SCIM/SSO application can now connect with New Relic. Continue with the following section to configure the provisioning rules.
Step 4. Configure provisioning rules
Initially, nothing is configured to be sent to New Relic. You must configure Azure AD to send changes for user creation, updates, and deactivation.
Go to the Provisioning page and complete the following:
Expand the Mappings section.
Click Provision Azure Active Directory Users.
Verify the Target Object Actions Create Update and Delete checkboxes are all checked.
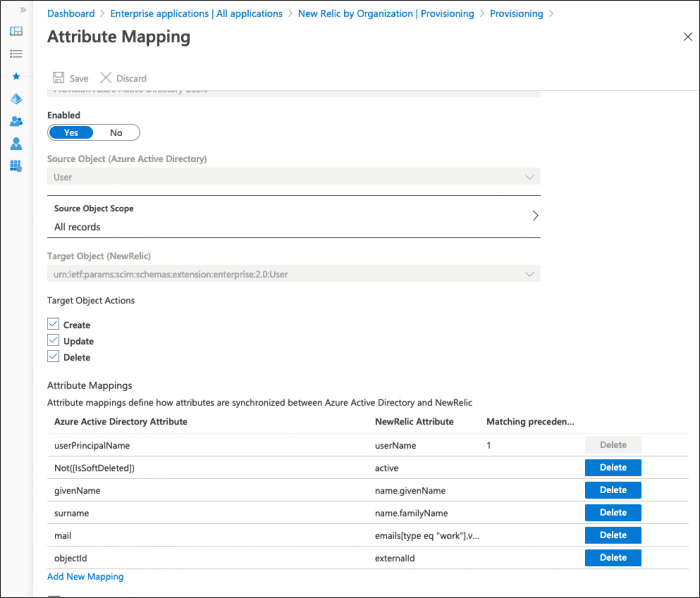
Verify the Attribute Mappings look correct for your environment. Each of the New Relic attributes shown in the list must receive a value.
Tip
Ensure that the Azure Active Directory attributes shown in the list on the left are good sources for the information to send to New Relic. In particular, not all environments set the mail attribute. If your environment does not set the mail attribute, userPrincipalName could be a good alternative.
Leave the switch for Enabled set to Off until you're done with the user and group configuration in the next section. Once all configuration is ready, return to this page and set the switch to On.
Click Save.
Here's an example of a filled-in attribute mapping page with the default values. Your values may be configured differently depending on your situation.
After saving the provisioning rules, the New Relic SCIM/SSO application is ready to provision any changes made to users assigned to the application. Continue with the following section to assign users and groups to the New Relic SCIM/SSO application.
Step 5. Set your users' user type
When your users are provisioned in New Relic, you're able to see them in the User management UI.
If you're adding users to New Relic via SCIM but not managing their user type via SCIM, they start out as basic users. To upgrade users, you have two options:
- Use the User management UI to edit users.
- Configure the Azure app to manage user type.
Step 6. Assign access grants
Once these steps are completed, you should be able to see your users in New Relic by going to the User management UI. Now that your users are present in New Relic, you must grant them access to specific roles on specific accounts. If this is not done, your users don't yet have access to New Relic. To learn how to do this, see:
Step 7. Configure SAML SSO
To enable SAML SSO for your users, see the SAML instructions.
